
Kubernetes is a container management platform to manage your workloads without having to deal with the servers that run them. In this blog you’ll find the basics of deploying a container on a Kubernetes cluster and how to expose it to the world.
Why Kubernetes?
Almost everyone nowadays has worked with, or created containers. While working with a single container is easy and fun, running and maintaining highly available services at scale can be a enormous burden.
Luckily, Kubernetes simplifies the creation, scheduling and distribution of workloads.
Hands-on walkthrough?
To be able to work with Kubernetes we need a cluster. Most major cloud providers have ready to go Kubernetes cluster solutions. For easy local testing however Minikube is a great solution.
First install Minikube
Get Minikube here: https://minikube.sigs.k8s.io/docs/start/
Once installed, start Minikube with the command:
minikube start
This will start downloading a vm with Kubernetes and some tools. Once that’s finished, we check if it works.
Test and verify
minikube kubectl
#this will test that kubectl is installed and working

kubectl get nodes
#NAME       STATUS   ROLES    AGE   VERSION
#minikube   Ready    master   51m   v1.17.0
Running an application
Now that we have a working Kubernetes environment let’s create our deployment. The deployment will create and manage the containers inside, the so-called ‘pods’. An abstraction that Kubernetes uses to manage containers and their resources.
First create a file: deployment.yml
---
apiVersion: apps/v1     #api-to-use
kind: Deployment        #what kind of file is this
metadata:
  name: nginx           #name of the deployment
spec:
  selector:
    matchLabels:
      app: nginx
  template:
    metadata:
      labels:
        app: nginx
    spec:
      containers:
      - name: nginx           #name of the docker image to deploy
        image: nginx:latest   #docker image:version
        ports:
        - containerPort: 80   #port in use by the application
Tell Kubernetes to create a deployment for our Nginx app.
kubectl apply -f ./deployment.yml
#deployment.apps/nginx created
Check if the pods are running:
kubectl get po -o wide
#NAME                    READY   STATUS    RESTARTS   AGE    IP           NODE       NOMINATED NODE   READINESS GATES
#nginx-59c9f8dff-fvjqw   1/1     Running   0          2m4s   172.17.0.4   minikube   <none>           <none>
Now let us scale up the number of pods so we have more than 1 webserver.
kubectl edit deployment nginx
Look for the part where it shows the number of replicas.
spec:
  progressDeadlineSeconds: 600
  replicas: 1 #right here
  revisionHistoryLimit: 10
  selector:
    matchLabels:
      app: nginx
  strategy:
    rollingUpdate:
      maxSurge: 25%
      maxUnavailable: 25%
    type: RollingUpdate
Change the number to the amount of Nginx servers you want.
spec:
  progressDeadlineSeconds: 600
  replicas: 3 #i'll take 3 of those please
  revisionHistoryLimit: 10
  selector:
    matchLabels:
      app: nginx
  strategy:
    rollingUpdate:
      maxSurge: 25%
      maxUnavailable: 25%
    type: RollingUpdate
Let’s see what the number of replications does to our pods.
kubectl get po
#NAME                    READY   STATUS              RESTARTS   AGE
#nginx-59c9f8dff-fcp7b   0/1     ContainerCreating   0          1s
#nginx-59c9f8dff-rd8hw   0/1     ContainerCreating   0          1s
#nginx-59c9f8dff-z2gkw   1/1     Running             0          16h
So now we have 3 pods running Nginx but no way to access them. Let’s first test if they actually work.
kubectl get po -o wide   # -o wide will give more details like ip address
#NAME                    READY   STATUS    RESTARTS   AGE     IP           NODE       NOMINATED NODE   READINESS GATES
#nginx-59c9f8dff-fcp7b   1/1     Running   0          2m46s   172.17.0.7   minikube   <none>           <none>
#nginx-59c9f8dff-rd8hw   1/1     Running   0          2m46s   172.17.0.6   minikube   <none>           <none>
#nginx-59c9f8dff-z2gkw   1/1     Running   0          1h      172.17.0.4   minikube   <none>           <none>
With the IP’s we can access the pods to see if they work. First, we go into the Minikube vm so that we can access the containers directly:
minikube ssh
_ _
_ _ ( ) ( )
___ ___ (_) ___ (_)| |/') _ _ | |_ __
/' _ ` _ `\| |/' _ `\| || , < ( ) ( )| '_`\ /'__`\
| ( ) ( ) || || ( ) || || |\`\ | (_) || |_) )( ___/
(_) (_) (_)(_)(_) (_)(_)(_) (_)`\___/'(_,__/'`\____)

$
Inside the vm we use curl to check the index page of all 3 pods. Note that the IP I use for curl is the IP bound to the pod.
curl --head 172.17.0.7
#HTTP/1.1 200 OK
#Server: nginx/1.19.7
#Date: Tue, 23 Feb 2021 08:59:14 GMT
#Content-Type: text/html
#Content-Length: 612
#Last-Modified: Tue, 16 Feb 2021 15:57:18 GMT
#Connection: keep-alive
#ETag: "602beb5e-264"
#Accept-Ranges: bytes
Create a service
Here we have our first problem. We have 3 pods that are not accessible and every time we add or remove pods, we get varying IP addresses. We need a way to dynamically access the pods based on their Kubernetes properties, rather than static IP addressing.
This is where the service comes into play.
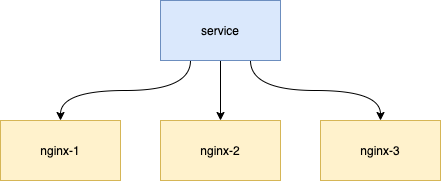
The service will dynamically route traffic to 1 of the available Nginx containers inside and expose itself to the outside world as an accessible NodePort on the host.
So how do we create a service?
Make a yml file with the following content. service.yml ->
apiVersion: v1                            #stable v1 api
kind: Service                             #what are we trying to create
metadata:
  name: nginx                             #what is my name
spec:
  ports:
  - port: 80
    protocol: TCP
    targetPort: 80
  selector:
    app: nginx
  type: NodePort                          #nodeport will open a port on the host to connect to the service
status:
  loadBalancer: {}
Now lets create this service.
kubectl apply -f ./service.yml
#service/nginx created
To check if the service was created.
kubectl get service
#NAME         TYPE        CLUSTER-IP      EXTERNAL-IP   PORT(S)        AGE
#kubernetes   ClusterIP   10.96.0.1       <none>        443/TCP        20h
#nginx        NodePort    10.96.168.208   <none>        80:31575/TCP   71s
Note that we now have a Nginx service that still has a IP we can not reach. But because we made a service of the type ‘nodeport’ it’s now bound to an external port on the Minikube vm. Thus we can access it.
We ask Minikube to provide us with the URL. (your IP and port may be different)
minikube service nginx --url
#http://192.168.64.2:31575

curl --head http://192.168.64.2:31575
#HTTP/1.1 200 OK
#Server: nginx/1.19.7
#Date: Tue, 23 Feb 2021 09:32:36 GMT
#Content-Type: text/html
#Content-Length: 612
#Last-Modified: Tue, 16 Feb 2021 15:57:18 GMT
#Connection: keep-alive
#ETag: "602beb5e-264"
#Accept-Ranges: bytes
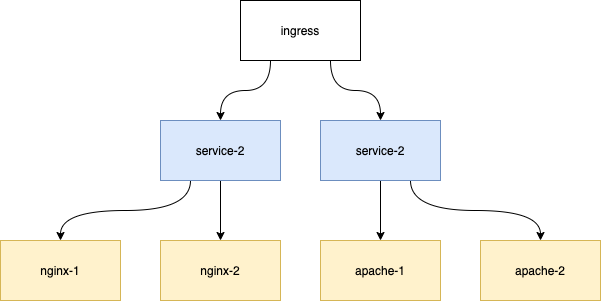
Access from the outside & ingress explained
So we now have 3 containers with Nginx that we can use from the outside.
But what if we want to use a hostname and port 80 (or 443), but both port 80 and 443 are already in use by Kubernetes? Or what if we might want multiple applications that all use port 80?
That is where the ingress comes in handy. The ingress translates incoming traffic based on hostname or path and directs it to the correct service.
Ingress deployment
To be able to deploy an ingress in Minikube we must enable the ingress controller first.
minikube addons enable ingress
#✅ ingress was successfully enabled
Next we create a yml file for the ingress.
---
apiVersion: networking.k8s.io/v1beta1
kind: Ingress
metadata:
  name: nginx-ingress
  annotations:
    nginx.ingress.kubernetes.io/rewrite-target: /$1
spec:
  rules:
  - host: nginx.techforce1.nl                        # hostname the ingress will match on
    http:
      paths:
      - path: /                                      # path to check for
        backend:
          serviceName: nginx                         # service to bind on
          servicePort: 80                            # port on the service to bind on
Now apply this file:
kubectl create -f ingress.yml
#ingress.networking.k8s.io/nginx-ingress created
Check if the creation was a success.
kubectl get ingress
#NAME            HOSTS                 ADDRESS        PORTS   AGE
#nginx-ingress   nginx.techforce1.nl   192.168.64.2   80      5m20s
Now add the information from the ingress in our hosts file (/etc/hosts on mac and linux).
sudo echo "192.168.64.2 nginx.techforce1.nl" >> /etc/hosts
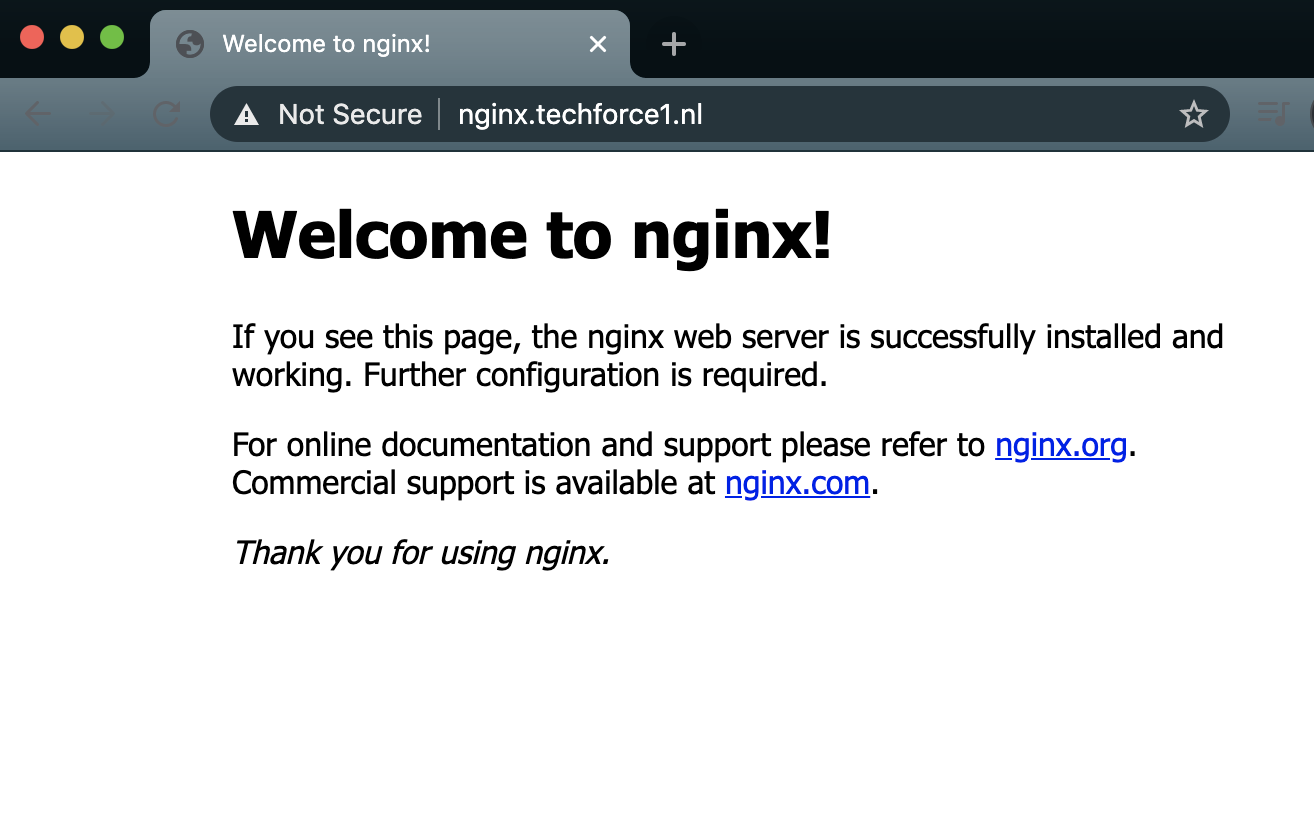
We can then access the Nginx via fqdn.
curl --head nginx.techforce1.nl
#HTTP/1.1 200 OK
#Server: openresty/1.15.8.2
#Date: Tue, 23 Feb 2021 13:23:42 GMT
#Content-Type: text/html
#Content-Length: 612
#Connection: keep-alive
#Vary: Accept-Encoding
#Last-Modified: Tue, 16 Feb 2021 15:57:18 GMT
#ETag: "602beb5e-264"
#Accept-Ranges: bytes
Or in our browser:

It works!


