
After ample consideration, we decided that the best way ahead was to use pipeline templates as preferred deliverable to our users.
Pipeline templating is a powerful feature within Azure DevOps
You can abstract pieces of your pipelines into separate template files, which can then be re-used across other pipelines. This functionality especially shines within large, corporate environments. In these large corporations, tooling for software development is usually standardized and often restricted in many ways. With so many software developers using the same toolkit, it makes sense to provide standardized toolchains to ensure best engineering practices between development teams.
When my team and I were working on the front-end templates, we found that the functionality of templates is actually so flexible that there are many ways to expose these to the template-consumers.
Now, the different ways of interfacing range widely in complexity, flexibility and composability. Each situation requires its own type of template and choosing the wrong template interface can make the solution more complex than intended. This sparks some questions: how to structure these templates? What’s the best way to make sure they are simple enough to interface with, yet provide enough functionality?
In this blog post I will go over a few ways to organize your templates, along with some use-cases and pro’s and cons.
Note: In the examples, I use some front-end terminology. However, the concepts of templates are the same for any type of project.
The ‘One template to rule them all’
Template
# File: template.yaml

# Whole flow from start to end
stages:
  - stage: Install
    steps:
      - bash: echo "registry=https://my.npm.domain/api" > .npmrc
      - task: Npm@0
        displayName: Npm install

  - stage: Build
    steps:
      - task: Webpack@0
        displayName: Webpack build

  - stage: Test
    steps:
      - task: Mocha@0
        displayName: Mocha test

  - stage: Publish
    steps:
      - bash: echo "registry=https://my.npm.domain/api" > .npmrc
      - task: Npm@0
        command: publish
        displayName: Publish NPM package
Consuming pipeline
# File: azure-pipelines.yaml
- template: template.yaml
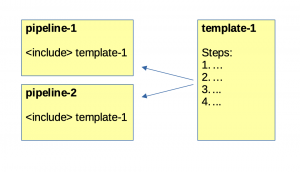
This type of template works very well when multiple pipelines need to run the exact same steps. For example, we have about 12 Azure DevOps extensions living in separate repositories. Each of these extensions need to be built, published and installed in the exact same way.
For this use-case, we have one `template.yaml` in a central repository. Each of the `pipeline.yaml` include this template in the exact same way, effectively saving 12 copy-pastes, whenever we need to change the pipeline.
All set?
Not quite yet, this type of template is not very suitable for customizations. To allow any customization of this template, you will need to add template parameters which resolve into conditionality. For complex pipelines, this approach gets out of hand quickly, and you might end up with many parameters and if-conditions, which is not desirable.
Customization through step injection
Template
# File: template.yaml

# Let template consumer define buildsteps
parameters:
  - name: buildsteps
    type: steplist

stages:
  - stage: Install
    steps:
      - bash: echo "registry=https://my.npm.domain/api" > .npmrc
      - task: Npm@0
        displayName: Npm install

  - stage: Build
    steps:
      # Execute buildsteps
      - ${{ each step in parameters.buildsteps }}:
        - ${{ step }}

  - stage: Test
    steps:
      - task: Mocha@0
        displayName: Mocha tests

  - stage: Publish
    steps:
      - bash: echo "registry=https://my.npm.domain/api" > .npmrc
      - task: Npm@0
        command: publish
        displayName: Publish NPM package
Consuming pipeline
# File: azure-pipelines.yaml
- template: template.yaml
  parameters:
    # Injecting the build steps
    buildsteps:
      - task: Rollup@0
        displayName: Rollup build
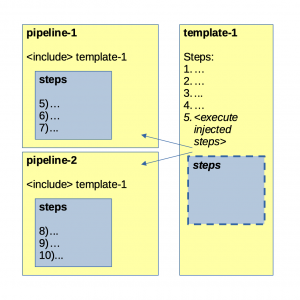
- most of the pipeline is fixed
- little customization is required
- the possible steps are not known from the template perspective
The ‘mix-and-match’ approach
Let’s break up our pipeline in small templates and assemble these together in a main pipeline.
Template
# File: templates/install.yaml
steps:
  - bash: echo "registry=https://my.npm.domain/api" > .npmrc
  - task: Npm@0
    displayName: Npm install
```

```yaml
# File: templates/build.yaml
steps:
  - task: Webpack@0
    displayName: Webpack build
```

```yaml
# File: templates/test.yaml
steps:
  - task: Mocha@0
    displayName: Mocha tests
```

```yaml
# File: templates/publish.yaml
steps:
  - bash: echo "registry=https://my.npm.domain/api" > .npmrc
  - task: Npm@0
    command: publish
    displayName: Publish NPM package
Consuming pipeline
# File: azure-pipelines.yaml
stages:
  - stage: install
    steps:
      - template: template-install.yaml

  - stage: build
    steps:
      - template: template-build.yaml

  - stage: test
    steps:
      - template: template-test.yaml

  - stage: publish
    steps:
      - template: template-publish.yaml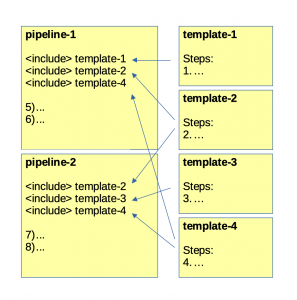
Conclusion
The freedom that our users now have, stands in contrast to our previous pipeline offering, which was more fixed and restrictive. The restrictions led to frustration to some of our power-users in the past. Needless to say their experience is more positive now 😉
To recap, I think it’s important to consider who is consuming your templates and with which use-case. Do all of your consumers need the same pipeline, or do they want to customize their pipeline completely?
Either way, I am sure you too will find, there are template styles to match their needs.


